Posted by: Cailyn | February 9, 2011

Three Creamy Soups for Chilly Days

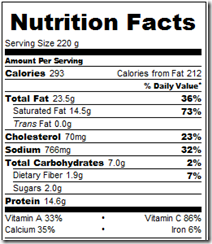
Here are three of my favorite soups to make on cold days, either as a main course or side dish.  I love serving a cup of hearty soup as an accompaniment to an expensive bit of meat, like lamb chops.  These soups all refrigerate well; reheat them gently with a little extra cream to “loosen” the soup the next day.  I’ll get pictures up next time I make these!


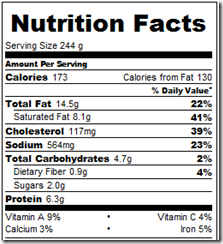
Broccoli Cheddar Soup

Makes about 8 cups.

  • 4 tbsp butter
  • 1/2 cup chopped onion
  • 1/4 cup chopped celery
  • 1/4 cup chopped carrots
  • 1 clove garlic, chopped
  • 1/2 tsp salt
  • 1/4 tsp white pepper
  • 1 tsp mustard powder
  • 1 tbsp flour or potato flour
  • 16 oz frozen broccoli florets (thawed) or freshly steamed broccoli
  • 3 cups chicken broth
  • 1/2 cup heavy cream
  • 12-16 oz shredded cheddar cheese (to taste)
  • In a medium saucepan, melt butter over medium-low heat. 

    Add the onion, celery, carrot, garlic, and salt to pot.  Cook until vegetables are soft, stirring occasionally, about 5-7 minutes. 

    Sprinkle flour, mustard powder, and pepper over vegetables and stir constantly for 2 minutes to make a roux

    Slowly add chicken broth, stirring, and increase heat to medium-high; bring to a boil. 

    Add 10-12 small broccoli florets to the pan.  Lower heat to a simmer, stirring occasionally, for 10 minutes to allow the starch in the flour time to expand. 

    Remove the pot from heat and puree soup with a hand-held immersion blender (or, in small batches, puree in a blender or food processor and return to the pot.) 

    Add the cream and remaining broccoli and bring to low simmer.

    Add the cheese in small handfuls and cook over low heat, stirring until each addition has melted before adding the next (this helps prevent the cheese from getting a grainy texture.) 

    Serve warm, topped with extra cheese.

    Notes: This soup really needs the starch in the flour (I use potato flour to avoid gluten), otherwise the cheese doesn’t stay suspended in the broth and separates out into an ugly mess.  I’m trying to work on a recipe that doesn’t use even that small amount of starch.  1 tbsp of potato flour has about 8g of carbs, which is about 1 extra gram per cup.  The white pepper is recommended to avoid little black specks of regular pepper floating in the soup, but it’s just a presentation suggestion- it doesn’t change the flavor.  Regular pepper can be used.

    Some people have suggested adding bacon or sausage to the soup- I haven’t tried it, but I bet it would be delicious!  This recipe is a basic cheese soup with broccoli added; you can leave out the broccoli, add other veggies with or instead, or just have cheese soup, or cheese soup with sausage, etc.  Try baking chicken in the leftover soup for a cheesy chicken broccoli casserole.

    image


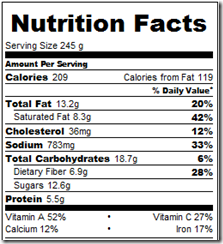
    Creamy Mushroom Soup

    Makes about 5 cups.

    • 4 tbsp butter
    • 4 cups mushrooms, sliced
    • 1/2 cup onion, diced
    • 2 cloves garlic, minced
    • dash salt, pepper, and cayenne pepper (optional) to taste
    • 1 tsp mustard powder
    • 2 tsp wild mushroom powder*
    • 3 cups chicken broth
    • 2 tbsp dry sherry or brandy
    • 2 egg yolks mixed with 1/4 c heavy cream

    Melt butter in a large skillet over medium-low heat. 

    Cook mushrooms, onions, and garlic in butter for about 30 minutes over medium-low heat, stirring occasionally, until the mixture is thick and the liquid from the butter and vegetables is almost syrupy.

    Add the salt, pepper, cayenne (optional), mustard, and wild mushroom powder.  Mix well and cook for 5 minutes.

    Slowly pour in chicken broth and sherry, stirring, and bring the soup to a simmer. 

    Whisk a few spoonfuls of the hot soup into the yolk/cream mixture to temper.  Slowly whisk yolk mixture into the soup and stir until thickened.

    *Wild mushroom powder:  Grind dried wild mushrooms in a food processor until powdered.

    Notes: Don’t rush on the tempering step!  Curdled eggs in your soup is not tasty.  Leftover tip- if there’s only a little soup left, reheat it with some extra cream to thin and use it as a sauce atop a steak or chicken.  This recipe originally came from Protein Power; I doubled the mushrooms.

    image


    Tomato Basil Soup

    Makes about 4 cups.

  • 4 tbsp butter
  • 1/4 cup chopped onion
  • 1/4 cup chopped celery
  • 1 clove garlic, chopped
  • 1/2 tsp salt
  • 2 14.5 oz cans diced or crushed tomatoes
  • 1/4 tsp ground pepper
  • 14-16 fresh basil leaves, sliced
  • 1/2-1 cup cream (to taste)
  • 1/4 cup shredded Parmesan cheese for garnish
  • 2-3 extra basil leaves for garnish
  • In a medium saucepan, melt butter over medium-low heat. 

    Add the onion, celery, garlic and salt.  Cook until vegetables are soft, stirring occasionally, about 5-7 minutes. 

    Add canned tomatoes, pepper, and basil and bring to a boil. 

    Lower the heat to a simmer and cook, stirring occasionally (tomatoes burn easily), for 15 minutes. 

    Remove the pot from the heat and puree soup with a hand-held immersion blender (or, in small batches, puree in a blender or food processor and return to the pot.) 

    Add cream to taste and return to a simmer until warmed through.  Serve warm, with extra sliced basil and Parmesan cheese as garnish.

    Notes: Fresh basil really makes a difference.  Fresh basil can usually be found in the veggie cold case at the grocery store.
    image

    Posted by: Cailyn | January 3, 2011

    Cookies

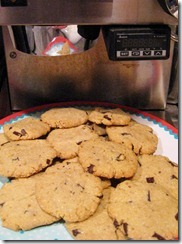
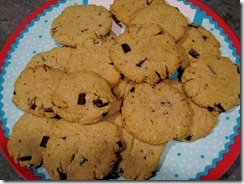
    It’s hard to deal with a holiday season without cookies.  Everybody has a particular traditional holiday cookie, usually some cut-out and decorated cookies.  So, like the birthday cake recipe, I view this as one of my go-to recipes for a good time.  They’re not the same as cookies made with flour, but they’re delicious.  Made with almond flour, the cookies are more delicate (read: crumbly) than flour cookies.  They also don’t brown the same way as flour cookies.  This particular recipe uses sugar.  It’s only a small amount of sugar, but it’s there.  The process of “creaming” the soft butter and sugar together in the first step really makes a difference; creaming adds air into the dough by having the sugar pulverize the butter, making the final cookies lighter.  Not quite “fluffy,” but close.

    IMG_0005   IMG_0001

    Just remember, these are still dessert, even though they’re not made with wheat flour.  They’re great for the occasional treat, but don’t eat the whole batch by yourself!


    Plain Almond Cookies

  • 1/2 cup room temperature butter
  • 1/4 cup sugar
  • 1 egg
  • 1/4 tsp. salt
  • 1 tsp. baking soda
  • 1/2 tsp. nutmeg
  • 1 tsp vanilla
  • 3 1/2 cups almond flour
  • Parchment paper or silicone baking mat
  • Optional:

  • (For cut-out cookies) Additional almond flour as needed for rolling pin and cutting surface
  • (For chocolate chip cookies) 1/2 cup dark chocolate chips
  • (for thumbprint cookies) low-sugar jam
  • Makes about 36 cookies.


    In a large mixing bowl, cream together butter and sugar.  Mixture should lighten in color and increase in size as air is incorporated.

    Add egg, salt, baking soda, nutmeg, and vanilla to bowl and mix to combine.

    Slowly add the almond flour and mix until well combined.

    Scoop onto a large piece of plastic wrap.  Flatten into a thick patty and refrigerate dough for at least 1 hour.  (Refrigeration is optional for all but the cut-out cookies, but it is recommended.)

    Preheat oven to 325 degrees F.  Cover a baking sheet with parchment paper or a silicone baking mat.  Almond flour cookies are notorious for sticking.

    Break off small pieces of dough, roll into balls and flatten to about 1/4” thick (thinner for crisper cookies).  Place cookies on baking sheet about 1/2” apart.  (Cookies will expand slightly during baking.)

    Bake cookies for 12-17 minutes.  Cookies will not brown much and will be kind of soft until cooled.

    Let cool on the pan for at least 5 minutes, then move to a cooling rack.  The cookies are very delicate just out of the oven and will crumble if taken off the pan immediately.

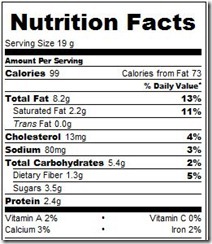
    cookie nutrition


    For cut-out cookies:

    Divide dough into two pieces.  Keep one in the fridge until needed.  Flour both sides of the dough with almond flour.  Lightly flour counter top or wooden pastry board.  Roll out to a thickness of 1/4 " using additional almond flour as needed.  Cut dough with cookie cutters that have been dipped in the almond flour. Move the cookies carefully to a cookie sheet that has been lined with parchment paper. Place cookies 1/2" apart. Gather dough scraps into a ball and re-roll.  When the dough gets too sticky and warm to work with, return to refrigerator until cold again.

    Bake as for plain cookies.


    IMG_0003

    For chocolate chip cookies:

    Follow plain cookie directions until all the almond flour has been incorporated.  Mix in the 1/2 cup dark chocolate chips.  Follow the rest of the instructions for chilling and baking.


    IMG_0007

    For thumbprint cookies:

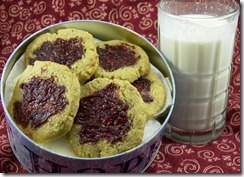
    Make, chill, and form cookies as for the plain cookies.  Place a tsp or so of low-sugar jam in the center of the raw cookies.  Spread the jam gently to avoid a large lump of jam.  Bake and cool as for plain cookies.


    113_5385

    Linzertorte is an Austrian dessert that I love, made from walnut flour and accented with raspberry jam.  The torte uses flour and can be hard to make, but these cookies taste nearly the same and are easy to create.  They’re great if you love walnuts too.

    Linzer Cookies

  • 1/2 cup very soft butter
  • 1/4 cup sugar
  • 1 egg
  • 1/4 tsp. salt
  • 1 tsp. baking soda
  • 1/2 tsp. nutmeg
  • 1 tsp vanilla
  • 2 1/2 cups walnut flour
  • 1 cup almond flour
  • Raspberry jam
  •  

    In a large mixing bowl, cream together butter and sugar.  Mixture should lighten in color and increase in size as air is incorporated.

    Add egg, salt, baking soda, nutmeg, and vanilla to bowl and mix to combine.

    Slowly add the walnut and almond flour and mix until well combined.

    Scoop onto a large piece of plastic wrap.  Flatten into a thick patty and refrigerate dough for at least 1 hour.  (Refrigeration is optional, but it is recommended.)

    Preheat oven to 325 degrees F.  Cover a baking sheet with parchment paper or a silicone baking mat.  Almond flour cookies are notorious for sticking.

    Break off small pieces of dough, roll into balls and flatten to about 1/4” thick (thinner for crisper cookies).  Place cookies on baking sheet about 1/2” apart.  (Cookies will expand slightly during baking.)

    Place a tsp or so of raspberry jam in the center of the raw cookies.  Spread the jam gently to avoid a large lump.

    Bake cookies for 12-17 minutes.  Cookies will not brown much and will be kind of soft until cooled.

    Let cool on the pan for at least 5 minutes, then move to a cooling rack.  The cookies are very delicate just out of the oven and will crumble if taken off the pan immediately.

    Posted by: Lowell | February 13, 2010

    Vibram FiveFingers / Barefoot Talking Points

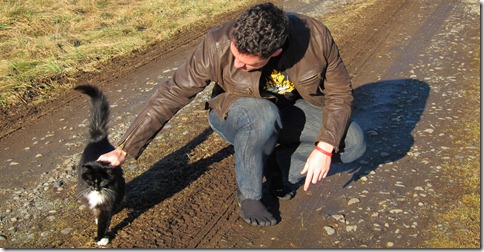
    Lowell at Meadowwood Farm wearing Vibram FiveFingers

    I’ve been a card-carrying barefoot believer since… well, looking at my Vibram FiveFingers order history, shortly after July 1, 2009 last year.  But, as I don’t want to build up barefoot calluses, would rather not violate no shirt/no shoes rules, and do appreciate protecting my feet from modern issues like broken glass, oil slicks, and other sharp/nasty things, I’m all about minimal or barefoot footwear.  Terra Plana’s Vivo Barefoot line is pretty good, especially if you want something that looks like normal shoes, Nike Free isn’t terrible… but nothing approaches Vibram FiveFingers in terms of providing the benefits of a natural barefoot experience with as few drawbacks as possible.  None of the other choices allows for free and natural toe movement, for one… and, well, they’re the only ones actually shaped like feet.  That’s a good sign they’re going to provide the most foot-like experience.

    Anyhow, wear VFFs for even a short time and—unlike the other barefoot shoe choices—you are going to be asked questions.  Lots of them.  Often incredulously.  As many of my friends and family are making the switch to Vibrams, I figure it’s important to be prepared for the interrogation.  Read on for my Barefoot Talking Points guide!  Links and references at the end.

    Read More…

    Posted by: Alton | January 26, 2010

    Perception

    Mindfulness is pre-symbolic. It is not shackled to logic. Nevertheless, Mindfulness can be experienced — rather easily — and it can be described, as long as you keep in mind that the words are only fingers pointing at the moon. They are not the thing itself. The actual experience lies beyond the words and above the symbols.

    -Mindfulness in Plain English, Chapter 13

    Abstraction is a dangerous thing. Representational logic is a necessary evil, but venture too far from the existant fabric that you attempt to describe, and you run the risk of completely losing the essential truth of a matter.

    A recent ‘study’ published in the New England Journal of Medicine is a great example of this mistake. The paper was based on the extrapolations made through use of a computer model about the possible health benefits of a reduced salt intake on cardiovascular health. They concluded that if everyone consumed less salt to the tune of 3 grams per day, we would see 60,000 to 120,000 fewer new cases of Coronary Heart Disease a year. The study, as you’d imagine, is a complete farce. Read More…

    Posted by: Lowell | November 30, 2009

    Site cleanup and new visitors

    Being that I’ve handed out the link to this site to a bunch of people lately, it was time to quick clean up some of the content here. I’ve revamped the Sources page (up top), added a new Recommended Posts page (up top) with info on my Google Reader shared posts feed (updates daily typically), and tweaked the right nav area a bit.

    Welcome, new visitors, and everyone enjoy the updates and new sources and references. Be excellent to each other… And party on, dudes.

    Posted by: Cailyn | November 6, 2009

    Coconut Butter Bites

    1102_4804 

    If you’ve been reading this (sadly neglected) blog or the various sources we’ve cited, you’ll know the great benefits of coconut.  Here’s a quick recap, though.

    Coconut is not only delicious, it’s a good source of medium-chain saturated fats.  Why are medium-chain fats good?  Because they can be absorbed directly instead of having to be broken down in the gut.  This is great for some quick, long-lasting energy and perfect for people who may have trouble digesting fats because of some digestive problems caused by a high-carb lifestyle.  Coconuts are 90% saturated fat- and who here doesn’t love saturated fat?  Saturated fat is used all over your body and improves your cholesterol, immune system and your general sense of well-being.  (This high amount of saturated fat is why coconut oil is solid at room temperature, like beef fat or lard.)  Coconut is particularly good for boosting your immune system because the main saturated fat in coconut is lauric acid (this turns into monolaurin in the body).  Lauric acid is antimicrobial and not only prevents pathogens from setting up camp in your body, it can convince them to high-tail it out if they have moved in.  Great news during flu season, right?

    Of course, coconut also has good vitamins and minerals as well as a large amount of fiber.  It also tastes sweet but doesn’t contain a lot of sugar.  Coconut oil is an even better source of lauric acid than raw coconut.  Coconut oil is a great way to get some extra fat, because a paleo lifestyle should be a high-fat lifestyle.  But let’s face it, very few of us want to choke down a spoonful or two of room temperature coconut oil or even melt it in some tea and drink it.  I have found a solution that, if I may say so myself, is genius.  Read on.

    There is a company, Premier Organics, that makes Artisana raw nut butters.  They make a coconut butter that is so dangerously delicious, it should be labeled as a controlled substance.  The coconut butter is nothing but 100% coconut- no added sugar, salt, or oils.  The only problem with this stuff is that it, like coconut oil, is solid at room temperature and with all the coconut solids in the mix, it can be as hard to scoop out of the jar until it’s warmed up.  The butter is pretty good when it’s melted but personally, I like to eat the coconut butter on the solid side, like a sweet truffle.  The butter then melts on my tongue and feels incredibly decadent.  After much thought, I have come up with the following recipe.  This recipe not only makes eating coconut butter easy, it’s portable and shelf-stable, it’s got extra coconut oil, and it’s fun!

    If you like this recipe, this site sells the coconut butter in 8lb or 16lb buckets which is cheaper than buying individual jars.

    102_4779

    Coconut Butter Bites

    Gently heat the coconut butter and oil (if using) until they are liquid.  I fill a large pot with water, put the jars in, and keep it on a low simmer until everything is melted.  You don’t want to cook the jars, just soften them.  A crockpot would work too, or a low-temperature oven, or a double boiler.

    Pour some of the coconut butter into a small bowl.  If you want, add some coconut oil until the mixture is kind of thin. This isn’t a science- if there’s too much oil, the finished bites will be a bit oilier and if there’s too little oil, the finished bites will be a little drier.  I usually add about 1/3 as much coconut oil as butter (so if I have 1 cup butter, I add an extra 1/3 cup of oil- but I don’t really measure.)

    Pour the mixture into the ice cube tray. The mixture will expand as it cools, so leave a little room at the top.  Gently tap the tray on the counter to bring any air bubbles to the surface.

    Let set either at room temperature or in the fridge for a faster set.

    Pop out of tray and enjoy.  I store my finished bites in glass jars in the pantry.  The bites can stay out of the fridge as long as your ambient temperature is below about 80 degrees F; any warmer than that and they’ll start to melt.

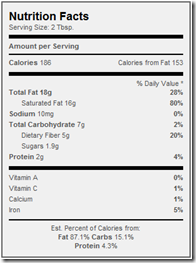
    Here’s the nutrition information (also found on the jar of coconut butter).  Remember that fiber doesn’t really count as a “carb”- subtract the grams of fiber from the grams of total carbs for the actual carb load!

    image


    Bored of plain coconut butter?  Try these additives for variety!

    Coconut Crunch

    Add dried, shredded coconut (unsweetened of course!) to the butter/oil mix.  I like to add a lot of shredded coconut for a serious crunch.  Once the bites set, the coconut adds a nice crunch, almost like a Nestle Crunch bar, as well as adding more coconut taste.  You can usually get shredded coconut in the bulk section of natural markets for cheaper.

    Harvest Spice

    Add some nutmeg, cinnamon, and quality vanilla extract to the mixture.  Add a little at a time and taste as you go to find the right amount of spices for you.  Unlike most applications, you can really taste the difference between average and high quality vanilla in these bites.  It’s worth a bit of a splurge.

    Chocolate Divine

    Add a tablespoon or two of raw cacao powder and quality vanilla to the mixture.  Depending on your cacao tolerance, you might need to add a touch of sweetener to mellow some of the bitterness of the chocolate.  I add just a small drizzle of honey when I make this one; remember that coconut is naturally sweet.  Don’t forget to taste as you add things!  This one tastes like hot cocoa to me; the more cacao you add, the darker the chocolate- add just a little for a milk chocolaty taste. 

    Dark Chocolate Crunch

    Add some shredded coconut to the Chocolate Divine and revel in the decadence of living a paleo lifestyle.

    Mexican Chocolate Supreme

    Add cinnamon and a little chile powder to the Chocolate Divine. (Go easy on the chile powder; it’s flavorful.)  This one’s Lowell’s favorite.

    Chocolate Raspberry

    Add some roughly crumbled freeze-dried raspberries (or other fruit; I like Just Fruit) to the Chocolate Divine.  The freeze-dried fruit stays pretty crunchy, but does add some trace carbs.  I might try this one with some freeze-dried bananas.  Try this add-in in the plain coconut ones too- coconut and strawberry is delicious!

    Chocolate Almond

    Add some slivered almonds (try toasting them first) in with the Chocolate Divine.

    Peppermint Hot Chocolate

    Add some peppermint extract to the Chocolate Divine.  Just a little goes a long way.  These are great around Christmas time.

    Lime-in-da-Coconut

    Add some fresh lime zest and lime juice or extract.  To avoid excess liquid if using lime juice, boil the juice for a minute or so to get a concentrated “syrup.”  It’s powerful stuff, so you don’t need much of it for a nice lime kick, just a tsp or two.

    Other ideas

    Add food coloring to any of the above for a fun look or swirl together plain coconut and chocolate.

    Add other flavor extracts, like hazelnut, lemon, coffee or peppermint. 

    Add a small amount of chopped low-sugar dried fruit, like goji berries or cranberries (not the sweetened kind), or maybe cacao nibs or espresso beans.  Remember that these will add some extra carbs (fruits) and caffeine (nibs and beans).  I like the freeze dried fruit because they stay crunchy in the coconut and there’s no added ingredients.

    Add finely chopped/ground nuts (someone suggested adding almond flour– sounds tasty!)

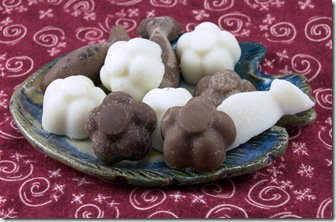
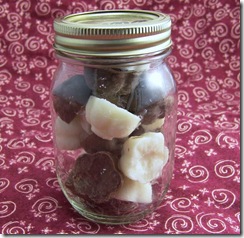
    I have some silicon ice cube trays from Ikea that make flower- and fish-shaped "ice cubes."  I make all my plain coconut bites as fish and all my crunch bites as flowers.  I’ve measured the indentations and each one holds about a tablespoon of liquid, which is just about as much coconut butter as I can eat at one time.  (I also use these molds when I make regular butter.)  The trays usually aren’t expensive- get a collection of fun shapes and go nuts with it!  I just found some penguin ones.  Mmm, chocolate penguins…

    102_4791

    Posted by: Lowell | November 6, 2009

    Cod Liver Oil != Omega-3 + Vitamin A + Vitamin D

    I don’t blame the nurse this morning, but my conversation this morning was frustrating for several reasons.  She asked me what vitamins or supplements I was taking, and I told her I take 1 tablespoon of natural cod liver oil daily.  She gave me a weird look, and I explained that it is high in Omega-3s, Vitamins A, and Vitamin D (I didn’t want to confuse her further with types of A and D…).  So she wrote down Omega-3, Vit-A, and Vit-D on her chart.  She frowned, and asked about the Omega 3s, and if I had received the information on herbs and supplements to discontinue before my procedure today.  I said I had, and asked her if her concern was because she felt that Omega-3s would thin the blood and increase the risk of bleeding.  She (surprised I knew that) agreed and said that indeed that was a significant risk and she would need to consult with the doctor.  I, trying to be as non-confrontational as possible, noted that Omega-3s typically reduce platelet aggregation, but only in healthy ways (i.e. reduce unhealthy levels of clotting), and have not been shown to reduce healthy clotting or increase risk from bleeding in healthy individuals.  They restore healthy functioning and reduce inflammation, which can include reducing platelet aggregation from unhealthy levels back to normal levels… but won’t take it below normal levels.  It restores protection from abnormal clotting, and the minor benefit (if any) from stopping it prior to a procedure needs to be weighed against the loss of the healthy benefits it provides, and in my personal estimation the overall risk is greater stopping it than in taking it.

    Anyhow, she left, and the final decision was that I hadn’t taken them in 23 hours, which was almost 24, so it was still safe to proceed.

    Read More…

    Posted by: Lowell | November 1, 2009

    My current “intro” email

    I thought it would be useful to take an edited version of the current email I send out to folks with links to info (books, websites, etc) and share it here.  It’s a good wrap up of what I would consider to be the best sources and places to start learning about where we went wrong with regards to health and nutrition, and how to fix it.

    Read on for the full mail and list of info.

    Read More…

    Posted by: Lowell | October 19, 2009

    What I’m reading (and sharing) online

    My current blog reading list continues to grow.  I’ve been using Google Reader for a while, and loving it.  I star items I find that are particular worth coming back to, and can search the entire back history of the blogs I follow for any particular topic of note and find all related posts.  If I want to see what all the doctors and other folks I follow have said about H1N1 or anything else, it’s incredibly easy.

    I realized that if I was marking items with a star for myself it wouldn’t be to hard to hit the “Share” button on posts I think are particularly worth checking out for others.  So, I’m going to give that a try.

    If you would like to keep an eye on any links I share, you can check them out here:  http://www.google.com/reader/shared/lowell.meyer.

    Or you can even get an Atom feed of my shared links for reuse elsewhere:  http://www.google.com/reader/public/atom/user%2F00468051034282820935%2Fstate%2Fcom.google%2Fbroadcast.

    I’m working on future posts myself on lab testing, and on hypoglycemics and primal/paleo/low-carb/real food.  Until then, enjoy some real food and be healthy.

    Free the Animal linked to a blog I hadn’t read before called Primal Wisdom.  It looks pretty good so far, and for now I’ve added it to the 9 other health-related blogs I follow on a daily basis.  The author is a philosophy major, nutritionist, sports trainer, and has studied oriental medicine as well.  He’s currently the head of the nutrition department at a school in Arizona.  In addition to just sharing the link to the blog in general, I ran across the following post that (amongst the many others out there on the topic) does a great job of providing a very short but good intro to how UVB light and Vitamin D3 are incredibly important, and very few people get enough of them anymore:
        http://donmatesz.blogspot.com/2009/05/perils-of-indoor-living-skin-cancer.html

    Read More…

    Older Posts »

    Categories